抱歉,您的浏览器无法访问本站
本页面需要浏览器支持(启用)JavaScript
了解详情 >

Redis安装部署

单机安装

Window 下安装

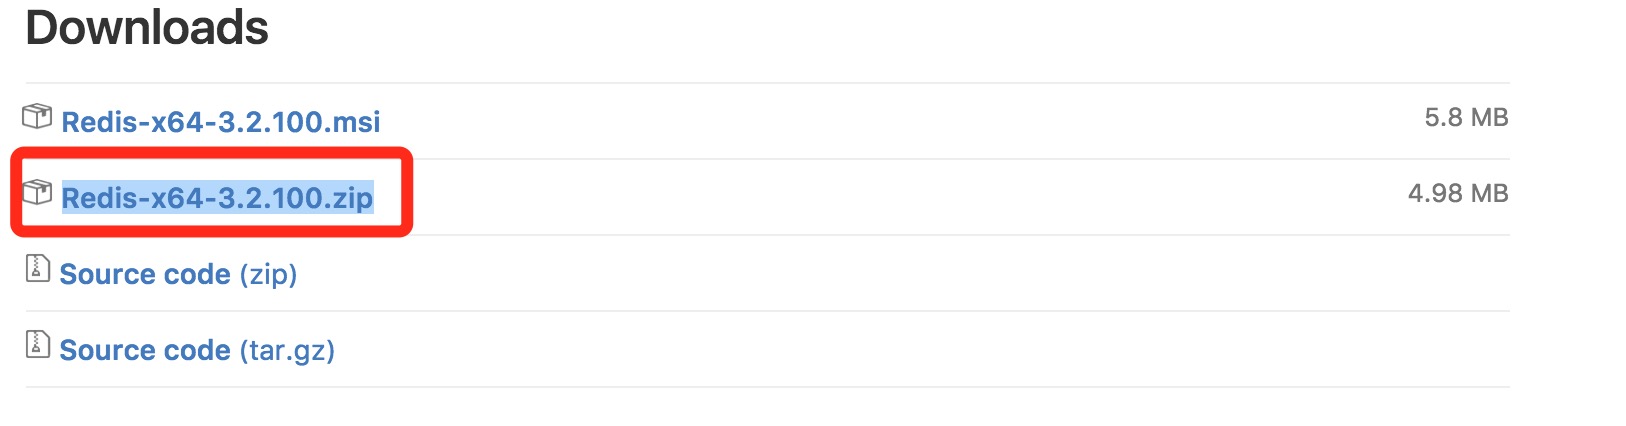
下载地址:https://github.com/MSOpenTech/redis/releases。

Redis 支持 32 位和 64 位。这个需要根据你系统平台的实际情况选择,这里我们下载 Redis-x64-xxx.zip压缩包到 C 盘,解压后,将文件夹重新命名为 redis

打开文件夹,内容如下:

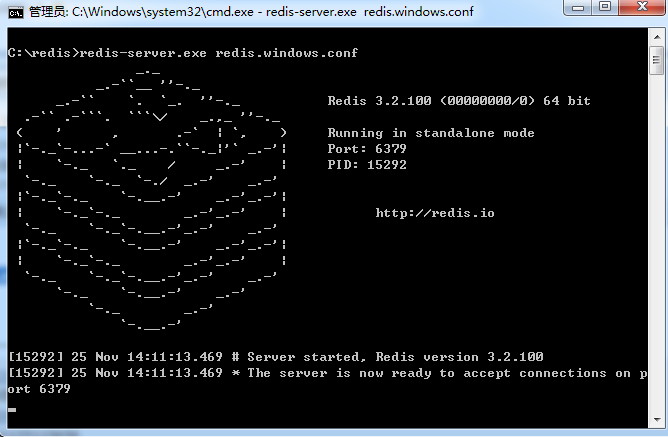
打开一个 cmd 窗口 使用 cd 命令切换目录到 C:\redis 运行:

1
redis-server.exe redis.windows.conf

​ 如果想方便的话,可以把 redis 的路径加到系统的环境变量里,这样就省得再输路径了,后面的那个 redis.windows.conf 可以省略,如果省略,会启用默认的。输入之后,会显示如下界面:

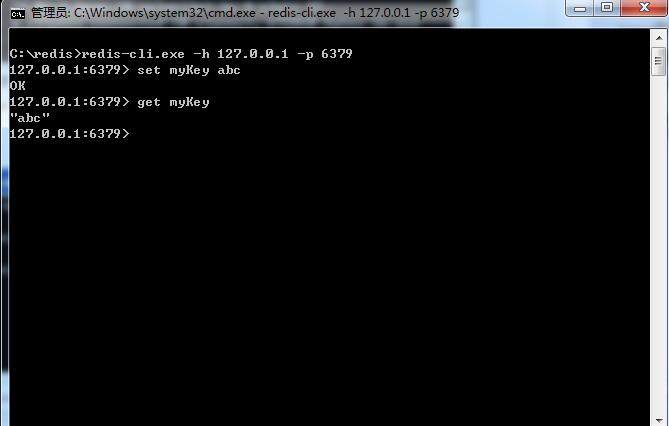
这时候另启一个 cmd 窗口,原来的不要关闭,不然就无法访问服务端了。

切换到 redis 目录下运行:

1
redis-cli.exe -h 127.0.0.1 -p 6379

设置键值对:

1
set myKey abc

取出键值对:

1
get myKey

Linux 下安装

安装编译环境
1
yum install gcc-c++ -y
下载Redis安装包

下载地址:http://redis.io/download,下载最新稳定版本。

本教程使用的版本为 redis-6.2.1,下载并安装:

1
wget https://download.redis.io/releases/redis-6.2.1.tar.gz
解压Redis
1
tar xzf redis-6.2.1.tar.gz
编译Redis

redis编译的时候加上MALLOC=libc,否则可能报编译错误:jemalloc/jemalloc.h:没有那个文件或目录

1
make MALLOC=libc

​ make完后 redis-6.2.1目录下会出现编译后的redis服务程序redis-server,还有用于测试的客户端程序redis-cli,两个程序位于安装目录 src 目录下:

启动Redis

下面启动redis服务.

1
2
cd src
./redis-server

注意这种方式启动redis 使用的是默认配置。也可以通过启动参数告诉redis使用指定配置文件使用下面命令启动。

1
2
cd src
./redis-server ../redis.conf

redis.conf 是一个默认的配置文件。我们可以根据需要使用自己的配置文件。

和Redis进行交互

启动redis服务进程后,就可以使用测试客户端程序redis-cli和redis服务交互了。 比如:

1
2
3
4
5
6
 cd src
./redis-cli
redis> set foo bar
OK
redis> get foo
"bar"
Redis目录下的命令文件
可执行文件 作用
redis-server 启动 redis
redis-cli redis 命令行客户端
redis-benchmark 基准测试工具
redis-check-aof AOF 持久化文件检测和修复工具
redis-check-dump RDB 持久化文件检测和修复工具
redis-sentinel 启动哨兵
redis-server 启动
直接启动

进入redis根目录,执行命令:
#加上‘&’号使redis以后台程序方式运行

1
./redis-server &

日志输出版本信息, 默认端口 6379

通过指定配置文件启动

可以为redis服务启动指定配置文件,例如配置为/etc/redis/6379.conf
进入redis根目录,输入命令:

1
./redis-server /etc/redis/6379.conf

如果更改了端口,使用redis-cli客户端连接时,也需要指定端口,例如:

1
redis-cli -p 6380
使用redis启动脚本设置开机自启动

启动脚本 redis_init_script 位于位于Redis的 /utils/ 目录下,redis_init_script脚本代码如下:

1
2
3
4
5
6
7
8
9
10
11
12
13
14
15
16
17
18
19
20
21
22
23
24
25
26
27
28
29
30
31
32
33
34
35
36
37
38
39
40
41
42
43
44
45
46
47
48
49
50
#!/bin/sh
#
# Simple Redis init.d script conceived to work on Linux systems
# as it does use of the /proc filesystem.

#redis服务器监听的端口
REDISPORT=6379

#服务端所处位置
EXEC=/usr/local/bin/redis-server

#客户端位置
CLIEXEC=/usr/local/bin/redis-cli

#redis的PID文件位置,需要修改
PIDFILE=/var/run/redis_${REDISPORT}.pid

#redis的配置文件位置,需将${REDISPORT}修改为文件名
CONF="/etc/redis/${REDISPORT}.conf"

case "$1" in
start)
if [ -f $PIDFILE ]
then
echo "$PIDFILE exists, process is already running or crashed"
else
echo "Starting Redis server..."
$EXEC $CONF
fi
;;
stop)
if [ ! -f $PIDFILE ]
then
echo "$PIDFILE does not exist, process is not running"
else
PID=$(cat $PIDFILE)
echo "Stopping ..."
$CLIEXEC -p $REDISPORT shutdown
while [ -x /proc/${PID} ]
do
echo "Waiting for Redis to shutdown ..."
sleep 1
done
echo "Redis stopped"
fi
;;
*)
echo "Please use start or stop as first argument"
;;
esac

根据启动脚本,将修改好的配置文件复制到指定目录下,用root用户进行操作:

1
2
mkdir /etc/redis
cp redis.conf /etc/redis/6379.conf

将启动脚本复制到/etc/init.d目录下,本例将启动脚本命名为redisd(通常都以d结尾表示是后台自启动服务)。

1
cp redis_init_script /etc/init.d/redisd

设置为开机自启动,直接配置开启自启动 chkconfig redisd on 发现错误: service redisd does not support chkconfig

解决办法,在启动脚本开头添加如下注释来修改运行级别:

1
2
#!/bin/sh
# chkconfig: 2345 90 10

再设置即可

1
2
3
4
5
6
#设置为开机自启动服务器
chkconfig redisd on
#打开服务
service redisd start
#关闭服务
service redisd stop
redis-cli启动
交互式

redis-cli -h {host} -p {prot}连接到 redis 服务, 没有 h 默认连 127.0.0.1。

1
./redis-cli -h 127.0.0.1 -p 6379 //没有 p 默认连 6379  
命令式
1
redis-cli -h 127.0.0.1 -p 6379 get hello //取 key=hello 的 value
停止 redis-cli 服务
1
./redis-cli shutdown

注意 :

  • 关闭时: 断开连接, 持久化文件生成, 相对安全
  • 还可以用 kill 关闭, 此方式不会做持久化, 还会造成缓冲区非法关闭, 可能会造成 AOF 和丢失数据
  • 关闭前生成持久化文件:使用 redis-cli -a 123456 登录进去, 再 shutdown nosave|save

docker 安装

获取 redis 镜像
1
docker pull redis
配置文件修改

从官网获取 redis.conf 配置文件

1
wget http://download.redis.io/redis-stable/redis.conf

修改配置文件

1
2
3
4
5
port 6379
bind 127.0.0.1
protected-mode no
dir ./
appendonly yes
参数解释
  • bind 127.0.0.1 #注释掉这部分,这是限制redis只能本地访问
  • protected-mode no #默认yes,开启保护模式,限制为本地访问
  • daemonize no#默认no,改为yes意为以守护进程方式启动,可后台运行,除非kill进程(可选),改为yes会使配置文件方式启动redis失败
  • dir ./ #输入本地redis数据库存放文件夹(可选)
  • appendonly yes #redis持久化(可选)
docker 启动 redis 命令
1
docker run -d -p 6379:6379 --name redis -v /tmp/etc/redis/redis.conf:/etc/redis/redis.conf -v /tmp/data/redis:/data redis redis-server /etc/redis/redis.conf --appendonly yes
命令解释说明
  • -p 6379:6379 端口映射:前表示主机部分,:后表示容器部分。
  • –name myredis 指定该容器名称,查看和进行操作都比较方便。
  • -v 挂载目录,规则与端口映射相同。
  • -d redis 表示后台启动redis
  • redis-server /etc/redis/redis.conf 以配置文件启动redis,加载容器内的conf文件,最终找到的是挂载的目录/usr/local/docker/redis.conf
  • appendonly yes 开启redis 持久化

Docker集群搭建

获取 redis 镜像

参考单机版

创建集群数据文件夹

1
mkdir node{1..8}

配置文件修改

参考单机版

集群配置修改
1
2
3
4
5
port 6379
databases 1
cluster-enabled yes
cluster-config-file nodes.conf
cluster-node-timeout 5000
集群参数解释
cluster-enabled <yes/no>

​ 如果想在特定的Redis实例中启用Redis群集支持就设置为yes。 否则,实例通常作为独立实例启动。

cluster-config-file <filename>

​ 请注意,尽管有此选项的名称,但这不是用户可编辑的配置文件,而是Redis群集节点每次发生更改时自动保留群集配置(基本上为状态)的文件,以便能够 在启动时重新读取它。 该文件列出了群集中其他节点,它们的状态,持久变量等等。 由于某些消息的接收,通常会将此文件重写并刷新到磁盘上。

cluster-node-timeout <milliseconds>

​ Redis群集节点可以不可用的最长时间,而不会将其视为失败。 如果主节点超过指定的时间不可达,它将由其从属设备进行故障切换。 此参数控制Redis群集中的其他重要事项。 值得注意的是,每个无法在指定时间内到达大多数主节点的节点将停止接受查询。

cluster-slave-validity-factor <factor>

​ 如果设置为0,无论主设备和从设备之间的链路保持断开连接的时间长短,从设备都将尝试故障切换主设备。 如果该值为正值,则计算最大断开时间作为节点超时值乘以此选项提供的系数,如果该节点是从节点,则在主链路断开连接的时间超过指定的超时值时,它不会尝试启动故障切换。 例如,如果节点超时设置为5秒,并且有效因子设置为10,则与主设备断开连接超过50秒的从设备将不会尝试对其主设备进行故障切换。 请注意,如果没有从服务器节点能够对其进行故障转移,则任何非零值都可能导致Redis群集在主服务器出现故障后不可用。 在这种情况下,只有原始主节点重新加入集群时,集群才会返回可用。

cluster-migration-barrier <count>

​ 主设备将保持连接的最小从设备数量,以便另一个从设备迁移到不受任何从设备覆盖的主设备。有关更多信息,请参阅本教程中有关副本迁移的相应部分。

cluster-require-full-coverage <yes / no>

​ 如果将其设置为yes,则默认情况下,如果key的空间的某个百分比未被任何节点覆盖,则集群停止接受写入。 如果该选项设置为no,则即使只处理关于keys子集的请求,群集仍将提供查询。

完整配置文件

完整配置文件如下

1
2
3
4
5
6
7
8
9
10
11
12
13
14
15
16
17
18
19
20
21
22
23
24
25
26
27
28
29
30
31
32
33
34
35
36
37
38
39
40
41
42
43
44
45
46
47
48
49
50
51
52
53
54
55
56
57
58
59
60
61
62
63
64
65
66
67
68
69
70
71
protected-mode no
port 6379
tcp-backlog 511
timeout 0
tcp-keepalive 300
daemonize no
supervised no
pidfile /var/run/redis_6379.pid
loglevel notice
logfile ""
databases 1
always-show-logo yes
save 900 1
save 300 10
save 60 10000
stop-writes-on-bgsave-error yes
rdbcompression yes
rdbchecksum yes
dbfilename dump.rdb
rdb-del-sync-files no
dir ./
replica-serve-stale-data yes
replica-read-only yes
repl-diskless-sync no
repl-diskless-sync-delay 5
repl-diskless-load disabled
repl-disable-tcp-nodelay no
replica-priority 100
acllog-max-len 128
lazyfree-lazy-eviction no
lazyfree-lazy-expire no
lazyfree-lazy-server-del no
replica-lazy-flush no
lazyfree-lazy-user-del no
oom-score-adj no
oom-score-adj-values 0 200 800
appendonly yes
appendfilename "appendonly.aof"
appendfsync everysec
no-appendfsync-on-rewrite no
auto-aof-rewrite-percentage 100
auto-aof-rewrite-min-size 64mb
aof-load-truncated yes
aof-use-rdb-preamble yes
lua-time-limit 5000
cluster-enabled yes
cluster-config-file nodes-6379.conf
cluster-node-timeout 15000
slowlog-log-slower-than 10000
slowlog-max-len 128
latency-monitor-threshold 0
notify-keyspace-events ""
hash-max-ziplist-entries 512
hash-max-ziplist-value 64
list-max-ziplist-size -2
list-compress-depth 0
set-max-intset-entries 512
zset-max-ziplist-entries 128
zset-max-ziplist-value 64
hll-sparse-max-bytes 3000
stream-node-max-bytes 4096
stream-node-max-entries 100
activerehashing yes
client-output-buffer-limit normal 0 0 0
client-output-buffer-limit replica 256mb 64mb 60
client-output-buffer-limit pubsub 32mb 8mb 60
hz 10
dynamic-hz yes
aof-rewrite-incremental-fsync yes
rdb-save-incremental-fsync yes
jemalloc-bg-thread yes

创建docker网络

1
docker network create docker-network

运行Redis镜像

分别使用以下命令启动3个Redis

1
2
3
4
5
6
7
8
9
10
11
12
docker run -d -p 7001:6379 --name redis01 --network docker-network -v /tmp/etc/redis/redis.conf:/etc/redis/redis.conf -v /tmp/data/redis/node1:/data redis redis-server /etc/redis/redis.conf 

docker run -d -p 7002:6379 --name redis02 --network docker-network -v /tmp/etc/redis/redis.conf:/etc/redis/redis.conf -v /tmp/data/redis/node2:/data redis redis-server /etc/redis/redis.conf

docker run -d -p 7003:6379 --name redis03 --network docker-network -v /tmp/etc/redis/redis.conf:/etc/redis/redis.conf -v /tmp/data/redis/node3:/data redis redis-server /etc/redis/redis.conf

docker run -d -p 7004:6379 --name redis04 --network docker-network -v /tmp/etc/redis/redis.conf:/etc/redis/redis.conf -v /tmp/data/redis/node4:/data redis redis-server /etc/redis/redis.conf

docker run -d -p 7005:6379 --name redis05 --network docker-network -v /tmp/etc/redis/redis.conf:/etc/redis/redis.conf -v /tmp/data/redis/node5:/data redis redis-server /etc/redis/redis.conf

docker run -d -p 7006:6379 --name redis06 --network docker-network -v /tmp/etc/redis/redis.conf:/etc/redis/redis.conf -v /tmp/data/redis/node6:/data redis redis-server /etc/redis/redis.conf

使用docker ps命令,查看是否启动成功

配置Redis集群

分别使用dokcer inspect docker-network 查看刚刚创建docker网络的IP

1
docker inspect docker-network

在Containers栏,可以看见该容器的Docker内网IP地址。

  • redis01:172.18.0.2:6379
  • redis02:172.18.0.3:6379
  • redis03:172.18.0.4:6379
  • redis04:172.18.0.5:6379
  • redis05:172.18.0.6:6379
  • redis06:172.18.0.7:6379

创建集群

进入一个容器中
1
docker exec -ti redis01 /bin/bash
执行创建集群命令
1
redis-cli --cluster create 172.18.0.2:6379 172.18.0.3:6379 172.18.0.4:6379 172.18.0.5:6379 172.18.0.6:6379 172.18.0.7:6379 --cluster-replicas 1

  • –cluster-replicas 1 表示副本数量
查看下Redis集群节点信息
1
redis-cli cluster nodes

docker-compose方式创建集群

前置工作

使用docker-compose前需要先清理redis的数据文件

1
rm -rf node*

创建集群数据文件夹

1
mkdir node{1..8}

编写docker-compose.yml

1
2
3
4
5
6
7
8
9
10
11
12
13
14
15
16
17
18
19
20
21
22
23
24
25
26
27
28
29
30
31
32
33
34
35
36
37
38
39
40
41
42
43
44
45
46
47
48
49
50
51
52
53
54
55
56
57
58
59
60
61
62
63
64
65
66
67
68
69
70
71
72
73
74
75
76
77
78
79
80
81
82
83
84
85
86
87
88
89
90
91
92
93
version: '2'   
services:
redis01:
image: redis
hostname: redis01
container_name: redis01
networks:
docker-network:
ipv4_address: 172.18.0.2
ports:
- "7001:6379"
volumes:
- "/tmp/etc/redis/redis.conf:/etc/redis/redis.conf"
- "/tmp/data/redis/node1:/data"
command:
redis-server /etc/redis/redis.conf
redis02:
image: redis
hostname: redis02
container_name: redis02
networks:
docker-network:
ipv4_address: 172.18.0.3
ports:
- "7002:6379"
volumes:
- "/tmp/etc/redis/redis.conf:/etc/redis/redis.conf"
- "/tmp/data/redis/node2:/data"
command:
redis-server /etc/redis/redis.conf
redis03:
image: redis
hostname: redis03
container_name: redis03
networks:
docker-network:
ipv4_address: 172.18.0.4
ports:
- "7003:6379"
volumes:
- "/tmp/etc/redis/redis.conf:/etc/redis/redis.conf"
- "/tmp/data/redis/node3:/data"
command:
redis-server /etc/redis/redis.conf
redis04:
image: redis
hostname: redis04
container_name: redis04
networks:
docker-network:
ipv4_address: 172.18.0.5
ports:
- "7004:6379"
volumes:
- "/tmp/etc/redis/redis.conf:/etc/redis/redis.conf"
- "/tmp/data/redis/node4:/data"
command:
redis-server /etc/redis/redis.conf
redis05:
image: redis
hostname: redis05
container_name: redis05
networks:
docker-network:
ipv4_address: 172.18.0.6
ports:
- "7005:6379"
volumes:
- "/tmp/etc/redis/redis.conf:/etc/redis/redis.conf"
- "/tmp/data/redis/node5:/data"
command:
redis-server /etc/redis/redis.conf
redis06:
image: redis
hostname: redis06
container_name: redis06
networks:
docker-network:
ipv4_address: 172.18.0.7
ports:
- "7006:6379"
volumes:
- "/tmp/etc/redis/redis.conf:/etc/redis/redis.conf"
- "/tmp/data/redis/node6:/data"
command:
redis-server /etc/redis/redis.conf

networks:
docker-network:
ipam:
config:
- subnet: 172.18.0.0/16
gateway: 172.18.0.1

启动镜像

1
docker-compose up -d

创建集群

进入一个容器中
1
docker exec -ti redis01 /bin/bash
执行创建集群命令
1
redis-cli --cluster create 172.18.0.2:6379 172.18.0.3:6379 172.18.0.4:6379 172.18.0.5:6379 172.18.0.6:6379 172.18.0.7:6379 --cluster-replicas 1

评论