Redis分布式锁
简介 分布式锁是控制分布式系统或不同系统之间共同访问共享资源的一种锁实现,如果不同的系统或同一个系统的不同主机之间共享了某个资源时,往往需要互斥来防止彼此干扰来保证一致性。
分布式锁,是一种思想,它的实现方式有很多。比如,我们将沙滩当做分布式锁的组件,那么它看起来应该是这样的:
加锁 在沙滩上踩一脚,留下自己的脚印,就对应了加锁操作。其他进程或者线程,看到沙滩上已经有脚印,证明锁已被别人持有,则等待。
解锁 把脚印从沙滩上抹去,就是解锁的过程。
锁超时 为了避免死锁,我们可以设置一阵风,在单位时间后刮起,将脚印自动抹去。
分布式锁的实现有很多,比如基于数据库、memcached、Redis、系统文件、zookeeper等。它们的核心的理念跟上面的过程大致相同。
基于Redis的锁 加锁 加锁实际上就是在redis中,给Key键设置一个值,为避免死锁,并给定一个过期时间。
1 SET lock_key random_value NX PX 5000
值得注意的是:random_value 是客户端生成的唯一的字符串。NX 代表只在键不存在时,才对键进行设置操作。PX 5000 设置键的过期时间为5000毫秒。
这样,如果上面的命令执行成功,则证明客户端获取到了锁。
解锁 解锁的过程就是将Key键删除。但也不能乱删,不能说客户端1的请求将客户端2的锁给删除掉。这时候random_value的作用就体现出来。
为了保证解锁操作的原子性,我们用LUA脚本完成这一操作。先判断当前锁的字符串是否与传入的值相等,是的话就删除Key,解锁成功。
1
2
3
4
5
if redis.call('get' ,KEYS[1 ]) == ARGV[1 ] then return redis.call('del' ,KEYS[1 ]) else return 0 end
锁超时 为了避免死锁,我们可以设置一阵风,在单位时间后刮起,将脚印自动抹去。
分布式锁的实现有很多,比如基于数据库、memcached、Redis、系统文件、zookeeper等。它们的核心的理念跟上面的过程大致相同。
java实现 引入POM 首先,我们在pom文件中,引入Jedis。在这里用的是最新版本,注意由于版本的不同,API可能有所差异。
1 2 3 4 5 <dependency > <groupId > redis.clients</groupId > <artifactId > jedis</artifactId > <version > 3.0.1</version > </dependency >
加锁 加锁的过程很简单,就是通过SET指令来设置值,成功则返回;否则就循环等待,在timeout时间内仍未获取到锁,则获取失败。
1
2
3
4
5
6
7
8
9
10
11
12
13
14
15
16
17
18
19
20
21
22
23
24
25
26
27
28
29
30
31
32
33
34
35
36
37
38
39
40
41
42
43
44
45
46
47
48
49
public class RedisLock { Logger logger = LoggerFactory.getLogger(this .getClass()); private String lock_key = "redis_lock" ; protected long internalLockLeaseTime = 30000 ; private long timeout = 999999 ; SetParams params = SetParams.setParams().nx().px(internalLockLeaseTime); @Autowired JedisPool jedisPool; public boolean lock (String id) { Jedis jedis = jedisPool.getResource(); Long start = System.currentTimeMillis(); try { for (;;){ String lock = jedis.set(lock_key, id, params); if ("OK" .equals(lock)){ return true ; } long l = System.currentTimeMillis() - start; if (l>=timeout) { return false ; } try { Thread.sleep(100 ); } catch (InterruptedException e) { e.printStackTrace(); } } }finally { jedis.close(); } } }
解锁 解锁我们通过jedis.eval来执行一段LUA就可以。将锁的Key键和生成的字符串当做参数传进来。
1 2 3 4 5 6 7 8 9 10 11 12 13 14 15 16 17 18 19 20 21 22 23 24 public boolean unlock (String id) { Jedis jedis = jedisPool.getResource(); String script = "if redis.call('get',KEYS[1]) == ARGV[1] then" + " return redis.call('del',KEYS[1]) " + "else" + " return 0 " + "end" ; try { Object result = jedis.eval(script, Collections.singletonList(lock_key), Collections.singletonList(id)); if ("1" .equals(result.toString())){ return true ; } return false ; }finally { jedis.close(); } }
测试 最后,我们可以在多线程环境下测试一下。我们开启1000个线程,对count进行累加。调用的时候,关键是唯一字符串的生成。这里,笔者使用的是Snowflake算法。
1
2
3
4
5
6
7
8
9
10
11
12
13
14
15
16
17
18
19
20
21
22
23
24
25
26
27
28
29
30
31
32
33
34
35
36
public class IndexController { @Autowired RedisLock redisLock; int count = 0 ; @RequestMapping("/index") @ResponseBody public String index () throws InterruptedException { int clientcount = 1000 ; CountDownLatch countDownLatch = new CountDownLatch (clientcount); ExecutorService executorService = Executors.newFixedThreadPool(clientcount); long start = System.currentTimeMillis(); for (int i = 0 ;i<clientcount;i++){ executorService.execute(() -> { String id = IdUtil.getId(); try { redisLock.lock(id); count++; }finally { redisLock.unlock(id); } countDownLatch.countDown(); }); } countDownLatch.await(); long end = System.currentTimeMillis(); logger.info("执行线程数:{},总耗时:{},count数为:{}" ,clientcount,end-start,count); return "Hello" ; } }
至此,单节点Redis的分布式锁的实现就已经完成了。比较简单,但是问题也比较大,最重要的一点是,锁不具有可重入性。
redisson
Redisson 是架设在Redis 基础上的一个Java驻内存数据网格(In-Memory Data Grid)。充分的利用了Redis键值数据库提供的一系列优势,基于Java实用工具包中常用接口,为使用者提供了一系列具有分布式特性的常用工具类。使得原本作为协调单机多线程并发程序的工具包获得了协调分布式多机多线程并发系统的能力,大大降低了设计和研发大规模分布式系统的难度。同时结合各富特色的分布式服务,更进一步简化了分布式环境中程序相互之间的协作。
相对于Jedis而言,Redisson强大的一批。当然了,随之而来的就是它的复杂性。它里面也实现了分布式锁,而且包含多种类型的锁,更多请参阅分布式锁和同步器
可重入锁 上面我们自己实现的Redis分布式锁,其实不具有可重入性。那么下面我们先来看看Redisson中如何调用可重入锁。
在这里,使用的是它的最新版本,3.10.1。
1 2 3 4 5 <dependency > <groupId > org.redisson</groupId > <artifactId > redisson</artifactId > <version > 3.10.1</version > </dependency >
首先,通过配置获取RedissonClient客户端的实例,然后getLock获取锁的实例,进行操作即可。
1
2
3
4
5
6
7
8
9
10
11
12
13
14
15
ublic static void main (String[] args) { Config config = new Config (); config.useSingleServer().setAddress("redis://127.0.0.1:6379" ); config.useSingleServer().setPassword("redis1234" ); final RedissonClient client = Redisson.create(config); RLock lock = client.getLock("lock1" ); try { lock.lock(); }finally { lock.unlock(); } }
获取锁实例 我们先来看RLock lock = client.getLock("lock1"); 这句代码就是为了获取锁的实例,然后我们可以看到它返回的是一个RedissonLock对象。
1
2
3
public RLock getLock (String name) { return new RedissonLock (connectionManager.getCommandExecutor(), name); }
在RedissonLock构造方法中,主要初始化一些属性。
1
2
3
4
5
6
7
8
9
10
11
public RedissonLock (CommandAsyncExecutor commandExecutor, String name) { super (commandExecutor, name); this .commandExecutor = commandExecutor; this .id = commandExecutor.getConnectionManager().getId(); this .internalLockLeaseTime = commandExecutor. getConnectionManager().getCfg().getLockWatchdogTimeout(); this .entryName = id + ":" + name; }
加锁 当我们调用lock方法,定位到lockInterruptibly。在这里,完成了加锁的逻辑。
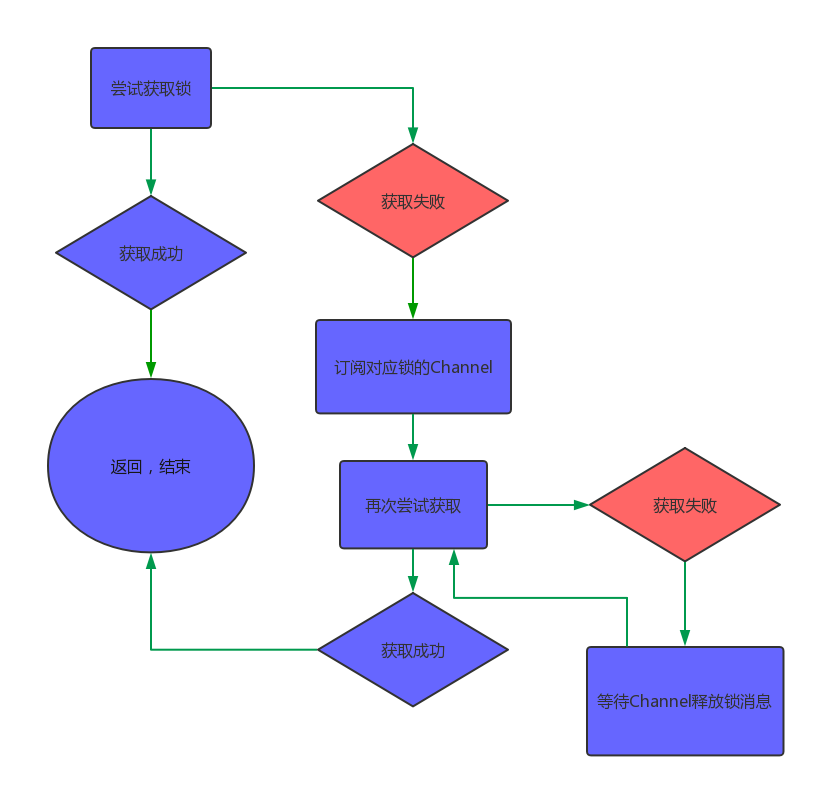
1
2
3
4
5
6
7
8
9
10
11
12
13
14
15
16
17
18
19
20
21
22
23
24
25
26
27
28
29
30
31
32
33
34
35
public void lockInterruptibly (long leaseTime, TimeUnit unit) throws InterruptedException { long threadId = Thread.currentThread().getId(); Long ttl = tryAcquire(leaseTime, unit, threadId); if (ttl == null ) { return ; } RFuture<RedissonLockEntry> future = subscribe(threadId); commandExecutor.syncSubscription(future); try { while (true ) { ttl = tryAcquire(leaseTime, unit, threadId); if (ttl == null ) { break ; } if (ttl >= 0 ) { getEntry(threadId).getLatch().tryAcquire(ttl, TimeUnit.MILLISECONDS); } else { getEntry(threadId).getLatch().acquire(); } } } finally { unsubscribe(future, threadId); } }
如上代码,就是加锁的全过程。先调用tryAcquire来获取锁,如果返回值ttl为空,则证明加锁成功,返回;如果不为空,则证明加锁失败。这时候,它会订阅这个锁的Channel,等待锁释放的消息,然后重新尝试获取锁。流程如下:
获取锁 获取锁的过程是怎样的呢?接下来就要看tryAcquire方法。在这里,它有两种处理方式,一种是带有过期时间的锁,一种是不带过期时间的锁。
1
2
3
4
5
6
7
8
9
10
11
12
13
14
15
16
17
18
19
20
21
22
23
24
25
26
27
28
29
private <T> RFuture<Long> tryAcquireAsync (long leaseTime, TimeUnit unit, final long threadId) { if (leaseTime != -1 ) { return tryLockInnerAsync(leaseTime, unit, threadId, RedisCommands.EVAL_LONG); } RFuture<Long> ttlRemainingFuture = tryLockInnerAsync( commandExecutor.getConnectionManager().getCfg().getLockWatchdogTimeout(), TimeUnit.MILLISECONDS, threadId, RedisCommands.EVAL_LONG); ttlRemainingFuture.addListener(new FutureListener <Long>() { @Override public void operationComplete (Future<Long> future) throws Exception { if (!future.isSuccess()) { return ; } Long ttlRemaining = future.getNow(); if (ttlRemaining == null ) { scheduleExpirationRenewal(threadId); } } }); return ttlRemainingFuture; }
接着往下看,tryLockInnerAsync方法是真正执行获取锁的逻辑,它是一段LUA脚本代码。在这里,它使用的是hash数据结构。
1
2
3
4
5
6
7
8
9
10
11
12
13
14
15
16
17
18
19
20
21
22
23
24
<T> RFuture<T> tryLockInnerAsync (long leaseTime, TimeUnit unit, long threadId, RedisStrictCommand<T> command) { internalLockLeaseTime = unit.toMillis(leaseTime); return commandExecutor.evalWriteAsync(getName(), LongCodec.INSTANCE, command, "if (redis.call('exists', KEYS[1]) == 0) then " + "redis.call('hset', KEYS[1], ARGV[2], 1); " + "redis.call('pexpire', KEYS[1], ARGV[1]); " + "return nil; " + "end; " + "if (redis.call('hexists', KEYS[1], ARGV[2]) == 1) then " + "redis.call('hincrby', KEYS[1], ARGV[2], 1); " + "redis.call('pexpire', KEYS[1], ARGV[1]); " + "return nil; " + "end; " + "return redis.call('pttl', KEYS[1]);" , Collections.<Object>singletonList(getName()), internalLockLeaseTime, getLockName(threadId)); }
这段LUA代码看起来并不复杂,有三个判断:
通过exists判断,如果锁不存在,则设置值和过期时间,加锁成功 通过hexists判断,如果锁已存在,并且锁的是当前线程,则证明是重入锁,加锁成功 如果锁已存在,但锁的不是当前线程,则证明有其他线程持有锁。返回当前锁的过期时间,加锁失败
加锁成功后,在redis的内存数据中,就有一条hash结构的数据。Key为锁的名称;field为随机字符串+线程ID;值为1。如果同一线程多次调用lock方法,值递增1。
1
2
3
127.0 .0 .1 :6379 > hgetall lock11 ) "b5ae0be4-5623-45a5-8faa-ab7eb167ce87:1" 2 ) "1"
解锁 我们通过调用unlock方法来解锁。
1
2
3
4
5
6
7
8
9
10
11
12
13
14
15
16
17
18
19
20
21
22
23
24
25
26
27
28
29
30
31
32
33
34
35
public RFuture<Void> unlockAsync (final long threadId) { final RPromise<Void> result = new RedissonPromise <Void>(); RFuture<Boolean> future = unlockInnerAsync(threadId); future.addListener(new FutureListener <Boolean>() { @Override public void operationComplete (Future<Boolean> future) throws Exception { if (!future.isSuccess()) { cancelExpirationRenewal(threadId); result.tryFailure(future.cause()); return ; } Boolean opStatus = future.getNow(); if (opStatus == null ) { IllegalMonitorStateException cause = new IllegalMonitorStateException (" attempt to unlock lock, not locked by current thread by node id: " + id + " thread-id: " + threadId); result.tryFailure(cause); return ; } if (opStatus) { cancelExpirationRenewal(null ); } result.trySuccess(null ); } }); return result; }
然后我们再看unlockInnerAsync方法。这里也是一段LUA脚本代码。
1
2
3
4
5
6
7
8
9
10
11
12
13
14
15
16
17
18
19
20
21
22
23
24
25
26
27
28
29
protected RFuture<Boolean> unlockInnerAsync (long threadId) { return commandExecutor.evalWriteAsync(getName(), LongCodec.INSTANCE, EVAL, "if (redis.call('exists', KEYS[1]) == 0) then " + "redis.call('publish', KEYS[2], ARGV[1]); " + "return 1; " + "end;" + "if (redis.call('hexists', KEYS[1], ARGV[3]) == 0) then " + "return nil;" + "end; " + "local counter = redis.call('hincrby', KEYS[1], ARGV[3], -1); " + "if (counter > 0) then " + "redis.call('pexpire', KEYS[1], ARGV[2]); " + "return 0; " + "else " + "redis.call('del', KEYS[1]); " + "redis.call('publish', KEYS[2], ARGV[1]); " + "return 1; " + "end; " + "return nil;" , Arrays.<Object>asList(getName(), getChannelName()), LockPubSub.unlockMessage, internalLockLeaseTime, getLockName(threadId)); }
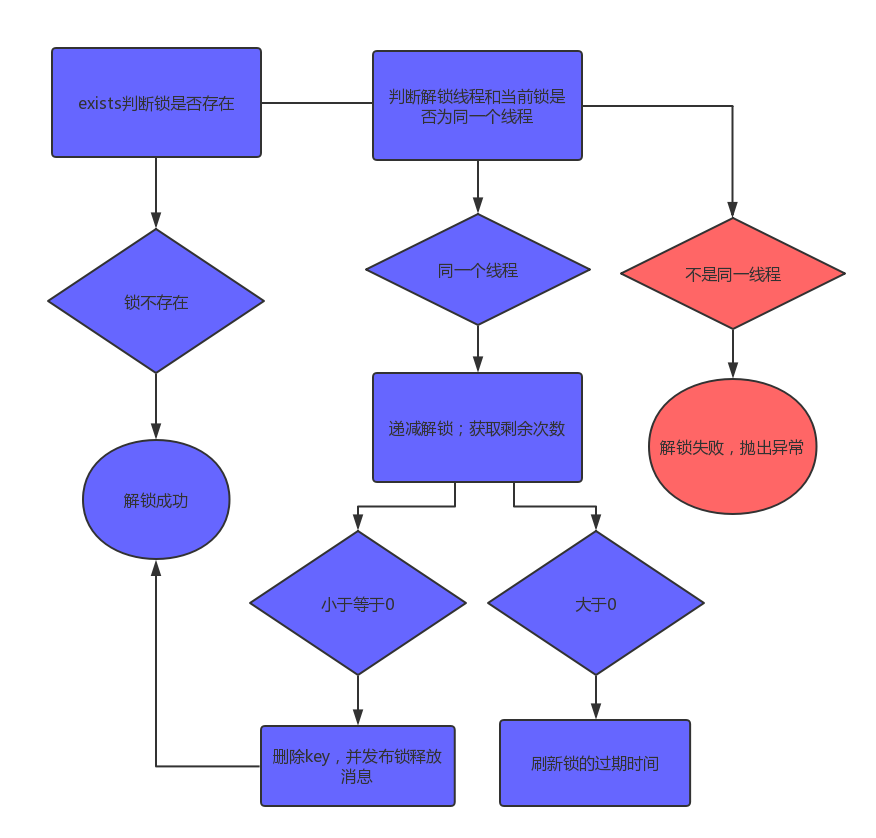
如上代码,就是释放锁的逻辑。同样的,它也是有三个判断:
如果锁已经不存在,通过publish发布锁释放的消息,解锁成功
如果解锁的线程和当前锁的线程不是同一个,解锁失败,抛出异常
通过hincrby递减1,先释放一次锁。若剩余次数还大于0,则证明当前锁是重入锁,刷新过期时间;若剩余次数小于0,删除key并发布锁释放的消息,解锁成功
至此,Redisson中的可重入锁的逻辑,就分析完了。但值得注意的是,上面的两种实现方式都是针对单机Redis实例而进行的。如果我们有多个Redis实例,请参阅Redlock算法 。该算法的具体内容,请参考http://redis.cn/topics/distlock.html